I saw this recipe on Facebook, you know one of those ones that people keep sharing the picture but you don't really know if it is going to taste as good as it looks. Well, this is one of those recipes.
Cheesy Chicken Enchiladas
10 soft taco size flour tortillas
2-3 cups cooked shredded chicken
2-3 cups shredded Mexican blend cheese
3 tbsp. butter
3 tbsp. flour
2 cups chicken broth
1 cup sour cream
1 4oz can diced green chilies
Preheat oven to 350 degrees.
Spray a 9x13 pan with non-stick spray. Mix the chicken and half the cheese together. (I used 3 cups each of cheese and chicken) Fill tortillas with mixture, fold ends in, roll up and place seam side in pan.
Melt the butter in a medium sauce pan. Add the flour, cook and stir for 1 minute. Add the chicken broth and whisk until smooth. Heat over medium heat until thick and bubbly. Turn heat down to low and add the sour cream and chilies. Whisk until sour cream lumps are gone. (If you use low fat sour cream, it may seem like it separates a little...this is fine, it will taste fine). Do not let this come to a boil...you don't want curdled sour cream. :)
Pour the sauce over the enchiladas and top with remaining cheese. Bake for 22-25 minutes. Remove from oven and set somewhere heat proof. Move the oven rack to the second highest slot. Turn your oven to broil HI. Put pan back in for 3 minutes or until cheese is brown and bubbly.
NOTE: You cannot broil stoneware, and I am pretty sure you shouldn't broil glass either. If you choose to do either of those, do them at your own risk! :) I used a metal pan to be safe.
My whole family loved these! I served them with refried beans and rice and it was better than a Mexican restaurant. The only other things I wished I had were chips and salsa and a margarita! Next time!
Enjoy!
Showing posts with label Main Dishes. Show all posts
Friday, October 4, 2013
Sunday, September 22, 2013
Buffalo Turkey Meatloaf
My hubby and I have always loved buffalo wings, but what we really love is the hot sauce/blue cheese combination. It has so much flavor! I had previously made Buffalo Turkey Meatballs, but meatballs are so labor intensive, and I don't really want to spend my time rolling meat into balls. So, I went ahead and modified the recipe and came up with this recipe for the meatloaf. I also double it. You can freeze the cooked meatloaf for another meal! Feel free to cut the recipe in half if you don't want two. :)
Buffalo Turkey Meatloaf
2-20 oz. packages of ground turkey (or chicken)
4 oz. 1/3 less fat cream cheese
2 eggs
1/3 cups chopped celery
1/3 cup crumbled low fat blue cheese
1 teaspoon pepper
6 oz. Frank's Red Hot + more for topping
Preheat oven to 350 degrees. Combine all ingredients in large bowl and mix well. Form into two loaves and place into a 15x10 glass dish. You can also use two smaller dishes if you don't have that size. Bake for 45 minutes. Coat with additional Frank's Red Hot sauce and bake for 15 more minutes, or until internal temperature registers 165 degrees. Let rest 5-10 minutes before slicing.
You will notice a lot of water bakes off the loaves. That is normal.
We really liked this! We tend to like things a little spicy, so we added even more hot sauce to the slices we put on our plate. I served this with broccoli. But it would be good with any hot veggie or a big salad!
Enjoy!
Buffalo Turkey Meatloaf
2-20 oz. packages of ground turkey (or chicken)
4 oz. 1/3 less fat cream cheese
2 eggs
1/3 cups chopped celery
1/3 cup crumbled low fat blue cheese
1 teaspoon pepper
6 oz. Frank's Red Hot + more for topping
Preheat oven to 350 degrees. Combine all ingredients in large bowl and mix well. Form into two loaves and place into a 15x10 glass dish. You can also use two smaller dishes if you don't have that size. Bake for 45 minutes. Coat with additional Frank's Red Hot sauce and bake for 15 more minutes, or until internal temperature registers 165 degrees. Let rest 5-10 minutes before slicing.
You will notice a lot of water bakes off the loaves. That is normal.
We really liked this! We tend to like things a little spicy, so we added even more hot sauce to the slices we put on our plate. I served this with broccoli. But it would be good with any hot veggie or a big salad!
Enjoy!
Tuesday, September 10, 2013
Bacon Cheeseburger Pasta
A couple of weeks ago, I asked the kids to go through some cookbooks and pick out some new recipes to try. Frankie picked this recipe and I was a little skeptical, but not wanting to discourage him, I decided to make it.
Bacon Cheeseburger Pasta - adapted from The Busy Family Cookbook
8 ounces penne pasta
1 pound ground beef (I used sirloin)
6 strips of bacon, diced
1 can condensed tomato soup (do not add water!)
1 cup shredded cheddar
Barbecue sauce and yellow mustard for topping
1. Boil pasta according to the directions on package.
2. While pasta is cooking, brown ground beef in a large skillet until no longer pink. Drain and scoop meat out into a heat proof bowl, and set aside.
3. In the same skillet, cook the bacon pieces until they are crispy. Remove the bacon using a slotted spoon and place the pieces on a plate lined with a couple of paper towels. Drain the bacon drippings from the pan.
4. Add cooked pasta to the skillet, return the beef and bacon to the pan as well. Add in the tomato soup and let it all heat through. Add the cheese on top, then cover and let cheese melt for a minute or two. Serve with barbecue sauce and mustard.
Ok, I know it does not sound healthy, but there are so many things you can substitute in the recipe to make it "healthier". I made it as written this time, but I would not be opposed to using whole wheat pasta, ground turkey, and low fat cheese.
I wasn't sure about the barbecue sauce and mustard, but believe me when I say, this is what made it taste SO yummy. It really was much tastier than I anticipated. We all gave Frankie the credit for picking it out, because honestly, it's not something I would have just looked at in the cook book and decided to make.
If you have a family bigger than 4, I'd suggest doubling it. We finished it, and there was at least one (teen boy) that would have eaten more if there had been more. Serve this with a big salad and you have an easy, yummy weeknight meal!!
Friday, August 30, 2013
Roasted Cherry Tomato Pasta
For as much as I love to cook, you would think that I would have a garden. However, I am terrible at taking care of plants/flowers/gardens, etc. I kill most everything that I touch. Even if I follow the care instructions perfectly. Also, I do not like bugs. And with all plants, come bugs. So, it’s just better if I buy my produce, or drop hints to my friends with gardens, that they can off load some of their harvest to me anytime (subtle, aren’t I?).
Anyhow, the first time I made this a few years ago, my friend Tara P. had shared some cherry tomatoes with me (as well as some yummy peppers!) from her garden. It just so happened I needed dinner for that day and I wanted to make some pasta and use those cherry tomatoes. I searched around online and came across some recipes and settled on this recipe. I made this again last night with a combination of store bought tomatoes and some from my neighbor's garden (she gave them to me, I didn't help myself!)
Roasted Cherry Tomato Pasta
2 bags of cherry tomatoes (NOT grape tomatoes)
2 tbsp. cup olive oil
4 tbsp. balsamic vinegar
Kosher salt
¼ cup fresh basil leaves, chopped (or 1 tbsp. dry basil)
½ cup kalamata olives, chopped
12 oz. your favorite pasta
1. Heat oven to 475 degrees.
2. Line a pan with foil, heavy duty is best, but any will work. Place tomatoes in pan and drizzle with the olive oil. Pour the vinegar over them and then sprinkle with kosher salt.
2. Roast tomatoes 18-20 minutes, or until tomatoes look blistered and about to burst.
3. Prepare pasta and place in a serving dish.
4. When tomatoes are done, carefully lift foil out and pour the contents over the pasta (this is why I prefer heavy duty foil...sturdier).
5. Stir in basil and olives.
Both times I have made this I didn't have or couldn't get fresh basil, so I used dry. I know it will be even better when I use the fresh basil.
Enjoy with a salad and some red wine! Delish!
Sunday, December 2, 2012
Hearty Oven Baked Chili
I have not made this chili in years. Seriously. I think the last time I made it before this time was when we lived in Michigan more than 7 years ago. I am not really sure why, but I got it in my head that I didn't like it. Well, was I wrong. My husband kept asking me to make it, so I finally did last week, and I LOVE it. And my kids thought it was great, too!
It makes a ton, so it's great if you have a large family, are going to have company, or just want to have leftovers. It does require a little prep (like anything!), but then you just put it in the oven and let it bake.
I have adapted this recipe from a Pampered Chef recipe that I got years ago.
Hearty Oven Baked Chili
2 1/2 pounds boneless meat stew meat, excess fat trimmed and cut into bite size pieces (1/2 inch cubes)
4 garlic cloves, minced (I use dried garlic)
2 tbsp. chili powder
1 1/2 tsp. dried oregano
3/4 tsp. ground cumin
3/4 tsp. salt
1/4 tsp. pepper
2 cups onions, coarsley chopped
2 cups green pepper, coarsely chopped
3 cans (14 1/2 oz each) diced tomatoes, undrained1
1 can (14 1/2 oz) tomato sauce
2 cans (15 1/2 oz) kidney beans (or your favorite beans), drained and rinsed
Sour cream
Shredded Cheddar
Preheat oven to 350 degrees. Place meat cubes into a large, oven proof dutch oven, (or I use the Pampered Chef Stoneware Baking Bowl). Sprinkle garlic and all seasonings over meat. Stir to coat the meat well. Add chopped onions, green pepper, diced tomatoes, tomato sauce, and beans. Mix well. Cover and bake for 2 1/2 hours or until meat is tender. (2 1/2 hours has always worked for me). Carefully remove from oven and lift lid away from you to avoid the hot steam that will come out!! Serve topped with sour cream and cheddar cheese, if desired.
We ate this for a few days, and it was so good every time. I baked some cornbread to go with it and it was a great meal for a cold day!
I will definitely be making it again soon!!
It makes a ton, so it's great if you have a large family, are going to have company, or just want to have leftovers. It does require a little prep (like anything!), but then you just put it in the oven and let it bake.
I have adapted this recipe from a Pampered Chef recipe that I got years ago.
Hearty Oven Baked Chili
2 1/2 pounds boneless meat stew meat, excess fat trimmed and cut into bite size pieces (1/2 inch cubes)
4 garlic cloves, minced (I use dried garlic)
2 tbsp. chili powder
1 1/2 tsp. dried oregano
3/4 tsp. ground cumin
3/4 tsp. salt
1/4 tsp. pepper
2 cups onions, coarsley chopped
2 cups green pepper, coarsely chopped
3 cans (14 1/2 oz each) diced tomatoes, undrained1
1 can (14 1/2 oz) tomato sauce
2 cans (15 1/2 oz) kidney beans (or your favorite beans), drained and rinsed
Sour cream
Shredded Cheddar
Preheat oven to 350 degrees. Place meat cubes into a large, oven proof dutch oven, (or I use the Pampered Chef Stoneware Baking Bowl). Sprinkle garlic and all seasonings over meat. Stir to coat the meat well. Add chopped onions, green pepper, diced tomatoes, tomato sauce, and beans. Mix well. Cover and bake for 2 1/2 hours or until meat is tender. (2 1/2 hours has always worked for me). Carefully remove from oven and lift lid away from you to avoid the hot steam that will come out!! Serve topped with sour cream and cheddar cheese, if desired.
We ate this for a few days, and it was so good every time. I baked some cornbread to go with it and it was a great meal for a cold day!
I will definitely be making it again soon!!
Wednesday, November 7, 2012
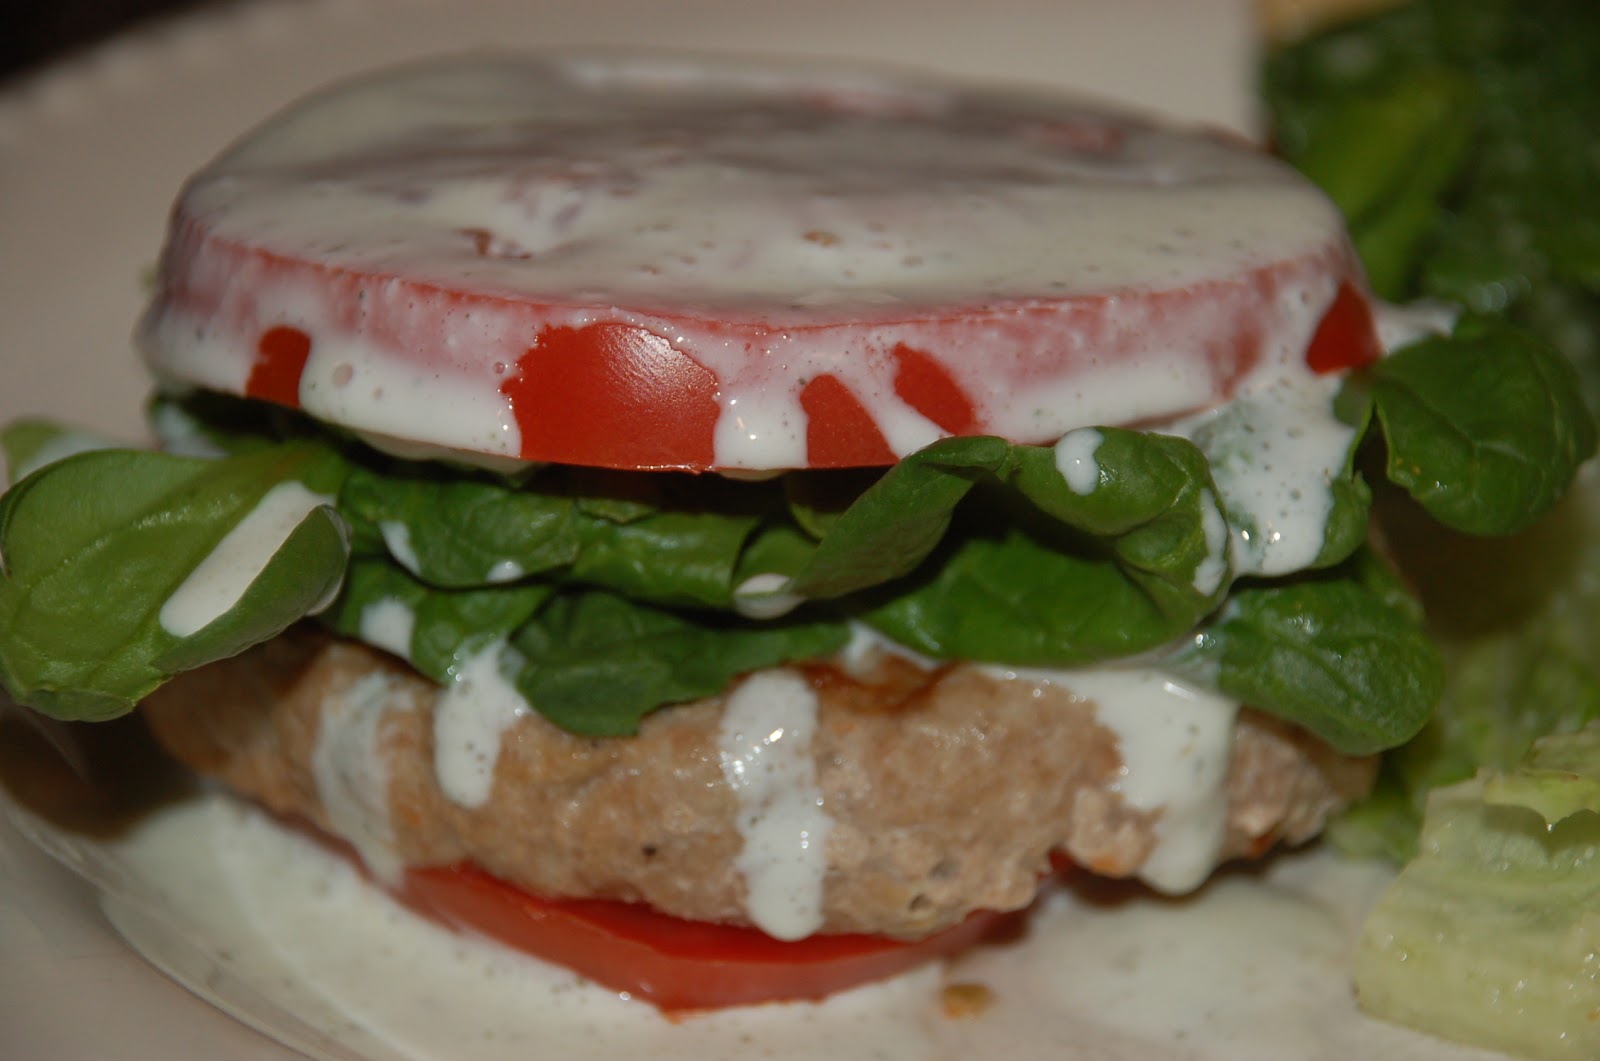
Greek-Style Turkey Burgers
I first made this recipe early this past year when Frank and I were following the 17 Day Diet eating plan. Both Frank and I realized we loved eating less carbs, and we felt better while we were doing it. So, several of the recipes have become ones I make often.
This recipe is a modification of a few recipes I came across. I like to make the turkey burger patties in advance and freeze them so I can pull them out easily when I want to make this recipe.
Greek Style Turkey Burgers
Burgers:
small diced onion or dried onion
1 egg
1 tablespoon lemon juice
2 teaspoons oregano
1 teaspoon basil
2 garlic cloves minced
1/2 teaspoon salt
1/4 teaspoon pepper
20 package ground turkey
Baby Spinach leave
3 tomato slices
Sauce:
1/2 cup plain, non-fat greek yogurt
1/4 cup chopped peeled cucumber
1/4 cup crumbled reduced-fat feta cheese
1/2 teaspoon dried dill
1 1/2 teaspoons lemon juice
1 small garlic clove, minced
In a mixing bowl, mix the burger ingredients (except for the spinach and tomato) together and shape into 4 patties. Grill on outdoor grill or countertop grill until burgers are cooked to 165 -170 degrees.
In a blender or food processor, place the sauce ingredients and blend until smooth.
Serve each burger by placing a tomato slice on the plate, top with a burger patty, then a handful of baby spinach, another tomato slice, then spoon sauce over top.
These are great if you are looking for a no/low carb meal. Yes, you have to eat it with a fork and knife, but they are still pretty delicious!
This recipe is a modification of a few recipes I came across. I like to make the turkey burger patties in advance and freeze them so I can pull them out easily when I want to make this recipe.
Greek Style Turkey Burgers
Burgers:
small diced onion or dried onion
1 egg
1 tablespoon lemon juice
2 teaspoons oregano
1 teaspoon basil
2 garlic cloves minced
1/2 teaspoon salt
1/4 teaspoon pepper
20 package ground turkey
Baby Spinach leave
3 tomato slices
Sauce:
1/2 cup plain, non-fat greek yogurt
1/4 cup chopped peeled cucumber
1/4 cup crumbled reduced-fat feta cheese
1/2 teaspoon dried dill
1 1/2 teaspoons lemon juice
1 small garlic clove, minced
In a mixing bowl, mix the burger ingredients (except for the spinach and tomato) together and shape into 4 patties. Grill on outdoor grill or countertop grill until burgers are cooked to 165 -170 degrees.
In a blender or food processor, place the sauce ingredients and blend until smooth.
Serve each burger by placing a tomato slice on the plate, top with a burger patty, then a handful of baby spinach, another tomato slice, then spoon sauce over top.
These are great if you are looking for a no/low carb meal. Yes, you have to eat it with a fork and knife, but they are still pretty delicious!
Cheeseburger/French Fry Casserole
This is a recipe I have made for my kids for years. It is not low-fat. It is not low-sodium. It is full of processed food items. So, if you are looking for something healthy. This isn't it.
However, it is easy, and pretty tasty. My kids enjoy it, and it makes enough to get some leftovers from.
I believe I got this recipe from a magazine years ago, and it's just kind of become a comfort food staple at our house.
Cheeseburger French Fry Casserole
2 lbs. browned ground beef
1 can Golden Mushroom soup (*see note)
1 can Cheddar Cheese soup
1 bag your favorite frozen french fries
1. Preheat oven to 350.
2. Mix browned beef and soups.
3. Spread in a 9x13 dish that has been sprayed with non-stick spray.
4. Top with french fries to cover.
5. Bake 35-40 minutes or until fries are lightly browned.
Serve topped with salt, pepper, ketchup, mustard and pickles.
*Note: Ok, this is TOP SECRET...but a few years back, one of my kids found a mushroom in the casserole. Well, they swore it was a mushroom, and I told them it wasn't. After that, I started running the Golden Mushroom soup through my mini-food processor to pulverize any evidence of the actual mushrooms! :)
I usually make this ahead by browning the beef and mixing it with the soups and placing it in the pan and then putting it in the fridge until I am ready to bake. At that point, I top it with the fries and put it in the oven.
Tonight I served it with a Caesar salad! Big hit and everyone was happy! :)
However, it is easy, and pretty tasty. My kids enjoy it, and it makes enough to get some leftovers from.
I believe I got this recipe from a magazine years ago, and it's just kind of become a comfort food staple at our house.
Cheeseburger French Fry Casserole
2 lbs. browned ground beef
1 can Golden Mushroom soup (*see note)
1 can Cheddar Cheese soup
1 bag your favorite frozen french fries
1. Preheat oven to 350.
2. Mix browned beef and soups.
3. Spread in a 9x13 dish that has been sprayed with non-stick spray.
4. Top with french fries to cover.
5. Bake 35-40 minutes or until fries are lightly browned.
Serve topped with salt, pepper, ketchup, mustard and pickles.
*Note: Ok, this is TOP SECRET...but a few years back, one of my kids found a mushroom in the casserole. Well, they swore it was a mushroom, and I told them it wasn't. After that, I started running the Golden Mushroom soup through my mini-food processor to pulverize any evidence of the actual mushrooms! :)
I usually make this ahead by browning the beef and mixing it with the soups and placing it in the pan and then putting it in the fridge until I am ready to bake. At that point, I top it with the fries and put it in the oven.
Tonight I served it with a Caesar salad! Big hit and everyone was happy! :)
Wednesday, December 21, 2011
Cabbage Casserole
I first tried this Casserole at my friend Kellie F.’s house. This is a recipe that her mom makes…and it’s REALLY good! I was hoping that she would share the recipe with me, and of course, she did! Now I am going to share it with you!
If you like Stuffed Cabbage (which I do), then you will like this. I think it’s even better, and way easier.
Cabbage Casserole
1 lb. ground sirloin or turkey
1 lb. italian sausage
1 medium head of cabbage cut in 2”x2” pieces
1 medium onion, chopped
1 cup rice (like Uncle Ben’s Converted, not Minute Rice)
1 bell pepper, chopped
2-3 cups of water
1 can of Ro-Tel tomatoes
Salt and pepper to taste
Brown the hamburger and sausage in a Dutch oven, or large pot. Once browned, add remaining ingredients, and mix well. Cover and simmer on low for 1 – 1 ½ hours, stirring occasionally.
This has got to be one of my most favorite meals. And it is incredibly easy. You can easily chop all the veggies the night before making this. The cabbage doesn’t have to be in perfect 2”x2” pieces, but you want them a decent size because they will cook up…don’t shred it. I used 3 cups of water in mine and it was the perfect amount. You can also use less Ro-Tel if you don’t want it as spicy (I don’t think it’s THAT spicy), but the Ro-Tel does give it a lot of flavor. Also, the italian sausage you use will add flavor, so you can always buy spicy sausage if you prefer, as well.
This makes a LOT of food. You can cut it in half, or eat it as leftovers. I am not sure how it would freeze…but you can make it ahead and transfer to a casserole dish to heat in the oven later, or to share with a friend or family member!
If you like Stuffed Cabbage (which I do), then you will like this. I think it’s even better, and way easier.
Cabbage Casserole
1 lb. ground sirloin or turkey
1 lb. italian sausage
1 medium head of cabbage cut in 2”x2” pieces
1 medium onion, chopped
1 cup rice (like Uncle Ben’s Converted, not Minute Rice)
1 bell pepper, chopped
2-3 cups of water
1 can of Ro-Tel tomatoes
Salt and pepper to taste
Brown the hamburger and sausage in a Dutch oven, or large pot. Once browned, add remaining ingredients, and mix well. Cover and simmer on low for 1 – 1 ½ hours, stirring occasionally.
This has got to be one of my most favorite meals. And it is incredibly easy. You can easily chop all the veggies the night before making this. The cabbage doesn’t have to be in perfect 2”x2” pieces, but you want them a decent size because they will cook up…don’t shred it. I used 3 cups of water in mine and it was the perfect amount. You can also use less Ro-Tel if you don’t want it as spicy (I don’t think it’s THAT spicy), but the Ro-Tel does give it a lot of flavor. Also, the italian sausage you use will add flavor, so you can always buy spicy sausage if you prefer, as well.
This makes a LOT of food. You can cut it in half, or eat it as leftovers. I am not sure how it would freeze…but you can make it ahead and transfer to a casserole dish to heat in the oven later, or to share with a friend or family member!
Monday, December 19, 2011
Spicy Garlic Lime Chicken
Many years ago, I visited my friend Tricia L. at her home and we spent an afternoon looking through cookbooks. I took some of her recipes home with me, and this became one of our favorites! It is very quick and easy, and most of the ingredients, are things you probably already have in your pantry (note: don’t keep chicken breast in the pantry).
Spicy Garlic Lime Chicken – I am not sure of it’s origin, but as far as I am concerned, it comes from Tricia L.
4 Chicken Breasts
¼ tsp. black peppers
¾ tsp. salt
¼ tsp. cayenne pepper
1/8 tsp. paprika
¼ tsp. garlic powder
1/8 tsp. onion powder
¼ tsp. thyme
¼ tsp. parsley
2 Tbsp. butter
1 Tbsp. olive oil
2 tsp. garlic powder
3 Tbsp. Lime juice
1. Use hammer on chicken covered with Saran Wrap to thin out and make even.
2. In a small bowl, mix first list of dry ingredients. Sprinkle ½ on one side of chicken.
3. Heat butter & oil in skillet over medium heat. Place chicken in skillet seasoned side down. Sprinkle other 1/2 of seasonings on top side of chicken. Sauté chicken until golden brown, about 5-6 minutes on each side. During last 2 minutes, sprinkle with 2 tsp. garlic powder & lime juice.
I can’t begin to tell you how yummy this is. You just have to try it! I like to serve it over Uncle Ben’s Converted Rice. It’s fairly simple to make, and you can have all the spices mixed up and your chicken pounded flat in advance! I use bottled lime juice because it’s easier, and it is still great!
Spicy Garlic Lime Chicken – I am not sure of it’s origin, but as far as I am concerned, it comes from Tricia L.
4 Chicken Breasts
¼ tsp. black peppers
¾ tsp. salt
¼ tsp. cayenne pepper
1/8 tsp. paprika
¼ tsp. garlic powder
1/8 tsp. onion powder
¼ tsp. thyme
¼ tsp. parsley
2 Tbsp. butter
1 Tbsp. olive oil
2 tsp. garlic powder
3 Tbsp. Lime juice
1. Use hammer on chicken covered with Saran Wrap to thin out and make even.
2. In a small bowl, mix first list of dry ingredients. Sprinkle ½ on one side of chicken.
3. Heat butter & oil in skillet over medium heat. Place chicken in skillet seasoned side down. Sprinkle other 1/2 of seasonings on top side of chicken. Sauté chicken until golden brown, about 5-6 minutes on each side. During last 2 minutes, sprinkle with 2 tsp. garlic powder & lime juice.
I can’t begin to tell you how yummy this is. You just have to try it! I like to serve it over Uncle Ben’s Converted Rice. It’s fairly simple to make, and you can have all the spices mixed up and your chicken pounded flat in advance! I use bottled lime juice because it’s easier, and it is still great!
Lasagna
I got this recipe from my sister-in-law, Diane, several years ago when I still lived in Michigan after she made it for us once! It is soooo good. I believe she got the recipe from her mom. I haven’t changed the ingredients, but I did simplify the assembly in order to cut down on the prep time (you know how I am about that). So, Diane, I hope you aren’t too upset!
Lasagna – from my SIL, Diane
1 pkg. Lasagna noodles
1 jar spaghetti sauce
1-3 pounds ground beef
1 large onion, diced
1 ½ packages mozzarella
1 egg
½ cup milk
24 oz. ricotta cheese
1 pkg. pepperoni
Parmesan Cheese
Cook noodles according to directions on box. Brown meat & onion in large skillet. Mix ricotta cheese, milk & egg together in medium bowl. Stir in mozzarella cheese. Spread a little bit of sauce into the bottom of a 9x13 pan. Mix the rest of the sauce into the meat and onion mixture. In the 9x13 pan place a layer or noodles, a layer of meat mixture, cheese mixture, pepperoni. Then repeat 1-2 more times, depending on how deep your pan is! Top with parmesan cheese, cover with foil and bake at 350°F for 1 hour and 15 minutes.
Now, you know me. I do things a little different. I like to use the Barilla No-Boil noodles. But when I do this, I assemble the Lasagna at least 8 hours before I am going to bake it, sometimes I do it the day before. I just HATE boiling lasagna noodles. They always stick together or tear and I just get mad.
I also use a little bit more of each ingredient because it just makes my life easier. But I have made this several times. You may want to follow the recipe the first time and figure out how you like it. I can’t find a nice 24 oz. size of ricotta cheese, but I can find 15 oz containers. So I use 2 of those. I mean really, what I am going to do with an extra 6 oz. of ricotta? Same with the mozzarella, I don’t want the extra ½ pack sitting around, so I just use it. It’s all good.
Anyhow, I just don’t see how anyone could NOT like this. If you like Lasagna, I promise you will like it!
Saturday, December 10, 2011
Turkey/Chicken Pot Pie
I froze some of the leftover Thanksgiving turkey so I could make this Pot Pie. I have made it before with chicken and its very yummy and pretty easy. I have no idea where I got this recipe! It could have been from a friend, a magazine, a website or somewhere else.
Chicken/Turkey Pot Pie
Crust
1 box (15 oz) Pillsbury refrigerated pie crusts, softened at room temp for 15 minutes
Filling
1/3 cup butter
1/3 cup chopped onion
1/3 cup flour
1/2 teaspoon salt
1/4 teaspoon pepper
1 3/4 cups chicken broth
1/2 cup milk
2 1/2 cups shredded cooked turkey or chicken
2 cups frozen mixed vegetables, thawed
Set oven to 425 degrees. Place one of the pie crusts into a 9 inch pie dish.
In a medium sauce pan, melt butter over medium heat. Add the onion and cook and stir until tender. Add flour, salt and pepper and stir well. Add broth and milk and cook until sauce is thickened and bubbly.
Mix in the chicken and the veggies and remove from heat. Carefully pour or spoon the mixture into the pie dish line with one of the crusts. Place the remaining crust on top and crimp the edge to seal. Cut a few slits in the top of the crust..
Bake 30 to 40 minutes, or until golden brown. Cover the crust edge with foil during the last 15 - 20 minutes of bake time. Let stand 15-20 minutes before serving.
This recipe is pretty easy and self explanatory. I will tell you that my biggest pet peeve with pot pie is transferring it neatly to a plate. Ours was just big jumbled blob of crust and saucy mixture on our plates. It tasted good, just didn't look pretty. The original recipe said let it sit for only 5 minutes, and I let it sit for 20....maybe 30 would be better!?!
We all enjoyed this! Good ol' comfort food!
Chicken/Turkey Pot Pie
Crust
1 box (15 oz) Pillsbury refrigerated pie crusts, softened at room temp for 15 minutes
Filling
1/3 cup butter
1/3 cup chopped onion
1/3 cup flour
1/2 teaspoon salt
1/4 teaspoon pepper
1 3/4 cups chicken broth
1/2 cup milk
2 1/2 cups shredded cooked turkey or chicken
2 cups frozen mixed vegetables, thawed
Set oven to 425 degrees. Place one of the pie crusts into a 9 inch pie dish.
In a medium sauce pan, melt butter over medium heat. Add the onion and cook and stir until tender. Add flour, salt and pepper and stir well. Add broth and milk and cook until sauce is thickened and bubbly.
Mix in the chicken and the veggies and remove from heat. Carefully pour or spoon the mixture into the pie dish line with one of the crusts. Place the remaining crust on top and crimp the edge to seal. Cut a few slits in the top of the crust..
Bake 30 to 40 minutes, or until golden brown. Cover the crust edge with foil during the last 15 - 20 minutes of bake time. Let stand 15-20 minutes before serving.
This recipe is pretty easy and self explanatory. I will tell you that my biggest pet peeve with pot pie is transferring it neatly to a plate. Ours was just big jumbled blob of crust and saucy mixture on our plates. It tasted good, just didn't look pretty. The original recipe said let it sit for only 5 minutes, and I let it sit for 20....maybe 30 would be better!?!
We all enjoyed this! Good ol' comfort food!
Chipotle Chili Cornbread Casserole
I learned of this recipe at a Pampered Chef a little over a year ago. I love it because it's all made in the microwave. Oh and it's delish.
Chipotle Chili Cornbread Casserole - adapted from Pampered Chef
1 medium green bell pepper, chopped
6 green onions, with tops, divided
1 lb. lean ground beef
1 can (16 oz.) chili beans in sauce
1 cup chunky salsa
1 tbsp. finely chopped chipotle peppers in adobo sauce (or 2 tbsp. Pampered Chef Chipotle Rub)
1 pkg. Jiffy cornbread mix
8 oz. sour cream
1 egg
1/2 cup shredded cheddar cheese
1. Chop the light green and the white parts of the of the onion to cook with the ground beef. Thinly slice the green onion tops. Reserve 1 tbsp. of the onion tops for garnish. Put the remaining tops in a medium bowl (which you will mix the cornbread in).
2. In a 3-quart, microwave safe casserole dish, combine the bell pepper, onion bottoms and beef; mix well. Cover and microwave on HIGH for 7-9 minutes or until beef is no longer pink, stopping halfway through to breakup meat and stir. Remove the dish from the microwave (it will be HOT) and carefully drain off the juices. Add the beans, salsa and adobo peppers (or rub) to the meat mixture and mix well. Replace the cover and microwave for 5 minutes or until hot.
3. While that cooks, mix the muffin mix, sour cream and egg in the bowl that has the green onion in it. Spread the muffin mix evenly over top of the chili and spread all the way to the edge of the dish. 4. 4. Place the cover on the dish and microwave on HIGH for 7-9 minutes or until center of cornbread springs back lightly when pressed. Remove from microwave and sprinkle with cheese. Cover and let stand for 5 minutes. Sprinkle with green onion and tomato.
This is one of my hubby's favorite meals. He loves the chipotle flavor in the chili. It's kind of smoky and adds so much flavor! I have made this several times, and I have used the rub and I have used the canned peppers. Both are good. You may have concerns about cooking your meat in the microwave. Don't. It's awesome. You won't be able to tell this difference.
I hope you enjoy this as much as we do!!
Chipotle Chili Cornbread Casserole - adapted from Pampered Chef
1 medium green bell pepper, chopped
6 green onions, with tops, divided
1 lb. lean ground beef
1 can (16 oz.) chili beans in sauce
1 cup chunky salsa
1 tbsp. finely chopped chipotle peppers in adobo sauce (or 2 tbsp. Pampered Chef Chipotle Rub)
1 pkg. Jiffy cornbread mix
8 oz. sour cream
1 egg
1/2 cup shredded cheddar cheese
1. Chop the light green and the white parts of the of the onion to cook with the ground beef. Thinly slice the green onion tops. Reserve 1 tbsp. of the onion tops for garnish. Put the remaining tops in a medium bowl (which you will mix the cornbread in).
2. In a 3-quart, microwave safe casserole dish, combine the bell pepper, onion bottoms and beef; mix well. Cover and microwave on HIGH for 7-9 minutes or until beef is no longer pink, stopping halfway through to breakup meat and stir. Remove the dish from the microwave (it will be HOT) and carefully drain off the juices. Add the beans, salsa and adobo peppers (or rub) to the meat mixture and mix well. Replace the cover and microwave for 5 minutes or until hot.
3. While that cooks, mix the muffin mix, sour cream and egg in the bowl that has the green onion in it. Spread the muffin mix evenly over top of the chili and spread all the way to the edge of the dish. 4. 4. Place the cover on the dish and microwave on HIGH for 7-9 minutes or until center of cornbread springs back lightly when pressed. Remove from microwave and sprinkle with cheese. Cover and let stand for 5 minutes. Sprinkle with green onion and tomato.
This is one of my hubby's favorite meals. He loves the chipotle flavor in the chili. It's kind of smoky and adds so much flavor! I have made this several times, and I have used the rub and I have used the canned peppers. Both are good. You may have concerns about cooking your meat in the microwave. Don't. It's awesome. You won't be able to tell this difference.
I hope you enjoy this as much as we do!!
French Onion Burgers
This is one of my family's new favorite recipes! It's so easy, too! It's a Campbell's soup recipe that I pulled out of a magazine. It's kind of a cross between a French Dip Sandwich and a Cheeseburger. Sorry I don't have a picture for this, but the last time I made these I was starving and in a huge hurry, so I wasn't thinking about the camera! You can see a picture by clicking the link to the Campbell's website below the recipe. But, I'm pretty sure you can picture a cheeseburger without a lot of help! ;)
French Onion Burgers - adapted from Campbell's
1 pound ground round
1 can (10 1/2 oz.) Campbell's French Onion soup
4 slices cheese (your favorite!)
4 hamburger buns
Shape the ground beef into 4 patties, about 1/2 inch thick. Heat a 10 inch skillet (with a lid....you'll need it later) over medium-high heat. Cook burgers until they are well browned on both sides, but you are not trying to fully cook them at this point. After browned, remove them from the skillet and pour/wipe any fat from the pan. Pour the French Onion soup into the skillet and bring to a boil. Place the hamburgers back in the skillet, reduce the heat, cover and simmer for 5 minutes. Remove from heat, place cheese on the burgers and let sit 1-2 minutes so the cheese can melt. Serve on buns with bowls of juice for dipping!!
The original recipe for this can be found right on the can of Campbell's French Onion Soup or at
http://www.campbellkitchen.com/RecipeDetail.aspx?recipeId=25508&ref=%2fSearchRecipesResult.aspx%3fq%3dfrench%2bonion%2bburger%26filter%3d
I love making these burgers. I can keep all the ingredients on hand easily, they are super quick to prepare, and my entire family loves them. My kids don't like to dip them in the soup, so they just put all their usual favorite cheeseburger toppings on. They love them because they are so juicy and flavorful. I like to serve them with French fries or sweet potato fries and a salad.
Enjoy!
French Onion Burgers - adapted from Campbell's
1 pound ground round
1 can (10 1/2 oz.) Campbell's French Onion soup
4 slices cheese (your favorite!)
4 hamburger buns
Shape the ground beef into 4 patties, about 1/2 inch thick. Heat a 10 inch skillet (with a lid....you'll need it later) over medium-high heat. Cook burgers until they are well browned on both sides, but you are not trying to fully cook them at this point. After browned, remove them from the skillet and pour/wipe any fat from the pan. Pour the French Onion soup into the skillet and bring to a boil. Place the hamburgers back in the skillet, reduce the heat, cover and simmer for 5 minutes. Remove from heat, place cheese on the burgers and let sit 1-2 minutes so the cheese can melt. Serve on buns with bowls of juice for dipping!!
The original recipe for this can be found right on the can of Campbell's French Onion Soup or at
http://www.campbellkitchen.com/RecipeDetail.aspx?recipeId=25508&ref=%2fSearchRecipesResult.aspx%3fq%3dfrench%2bonion%2bburger%26filter%3d
I love making these burgers. I can keep all the ingredients on hand easily, they are super quick to prepare, and my entire family loves them. My kids don't like to dip them in the soup, so they just put all their usual favorite cheeseburger toppings on. They love them because they are so juicy and flavorful. I like to serve them with French fries or sweet potato fries and a salad.
Enjoy!
Monday, November 28, 2011
Baked Brisket
I had never cooked a beef brisket before yesterday, but my daughter had been begging me to make one ever since she had some at a friend's house in October. I saw this recipe and it sounded like a good one to make for the first time.
Baked Brisket - adapted from a Southern Living magazine recipe
1 12 oz. bottle of chili sauce
2 cups ketchup
1 can Coke (not diet)
1 box Lipton dry onion soup mix
1 4 to 5 pound beef brisket
Mix the chili sauce, ketchup, Coke and BOTH packets of the onion soup mix together. In a roasting pan, put the brisket in fat side up and pour all of the chili sauce mixture over it. Cover the pan with a lid or aluminum foil. Bake for 4 hours at 350 degrees. You should be able to cut it with a fork when it is done. Let it rest for 20 minutes before slicing and serving. Top slices with pan juices, if desired.
The brisket I bought was just under 5 pounds and took 4 hours to cook. Don't trim off any of the fat. This helps keep the meat moist while cooking, and it comes right off after it is cooked. This brisket was so tender, it was impossible to slice. It was more like shredded beef, which was great, too!
Everyone in my family loved this. We ate it for 2 nights, and there are still leftovers. The sauce had a good taste. The whole flavor reminded me of a tomato based beef stew recipe from my Grandma that I make. I served it with some mashed potatoes, broccoli, and rolls.
I would make this again, but I would also like to try another brisket recipe just to have something to compare it to. It's hard to say when something's good, when you haven't made or at least tried a few different recipes! If you have a recipe for brisket you love, please let me know. I would love to try it!
More recipes to come! I have been baking Christmas cookies, and will be starting to prep my Thanksgiving dishes today!!!
Subscribe to:
Posts (Atom)